Your First Bulk Edit
Creating a bulk edit job is a 3-step process: pick the products with filters, define what to change with modifications, then choose when and how the job runs.
To start, click Start Bulk Edit on the home page or New Bulk Edit in the top nav.
The bulk edit workspace. Filters panel on the left, Modifications on the right, and a live results table below.
Step 1 — Define your filters
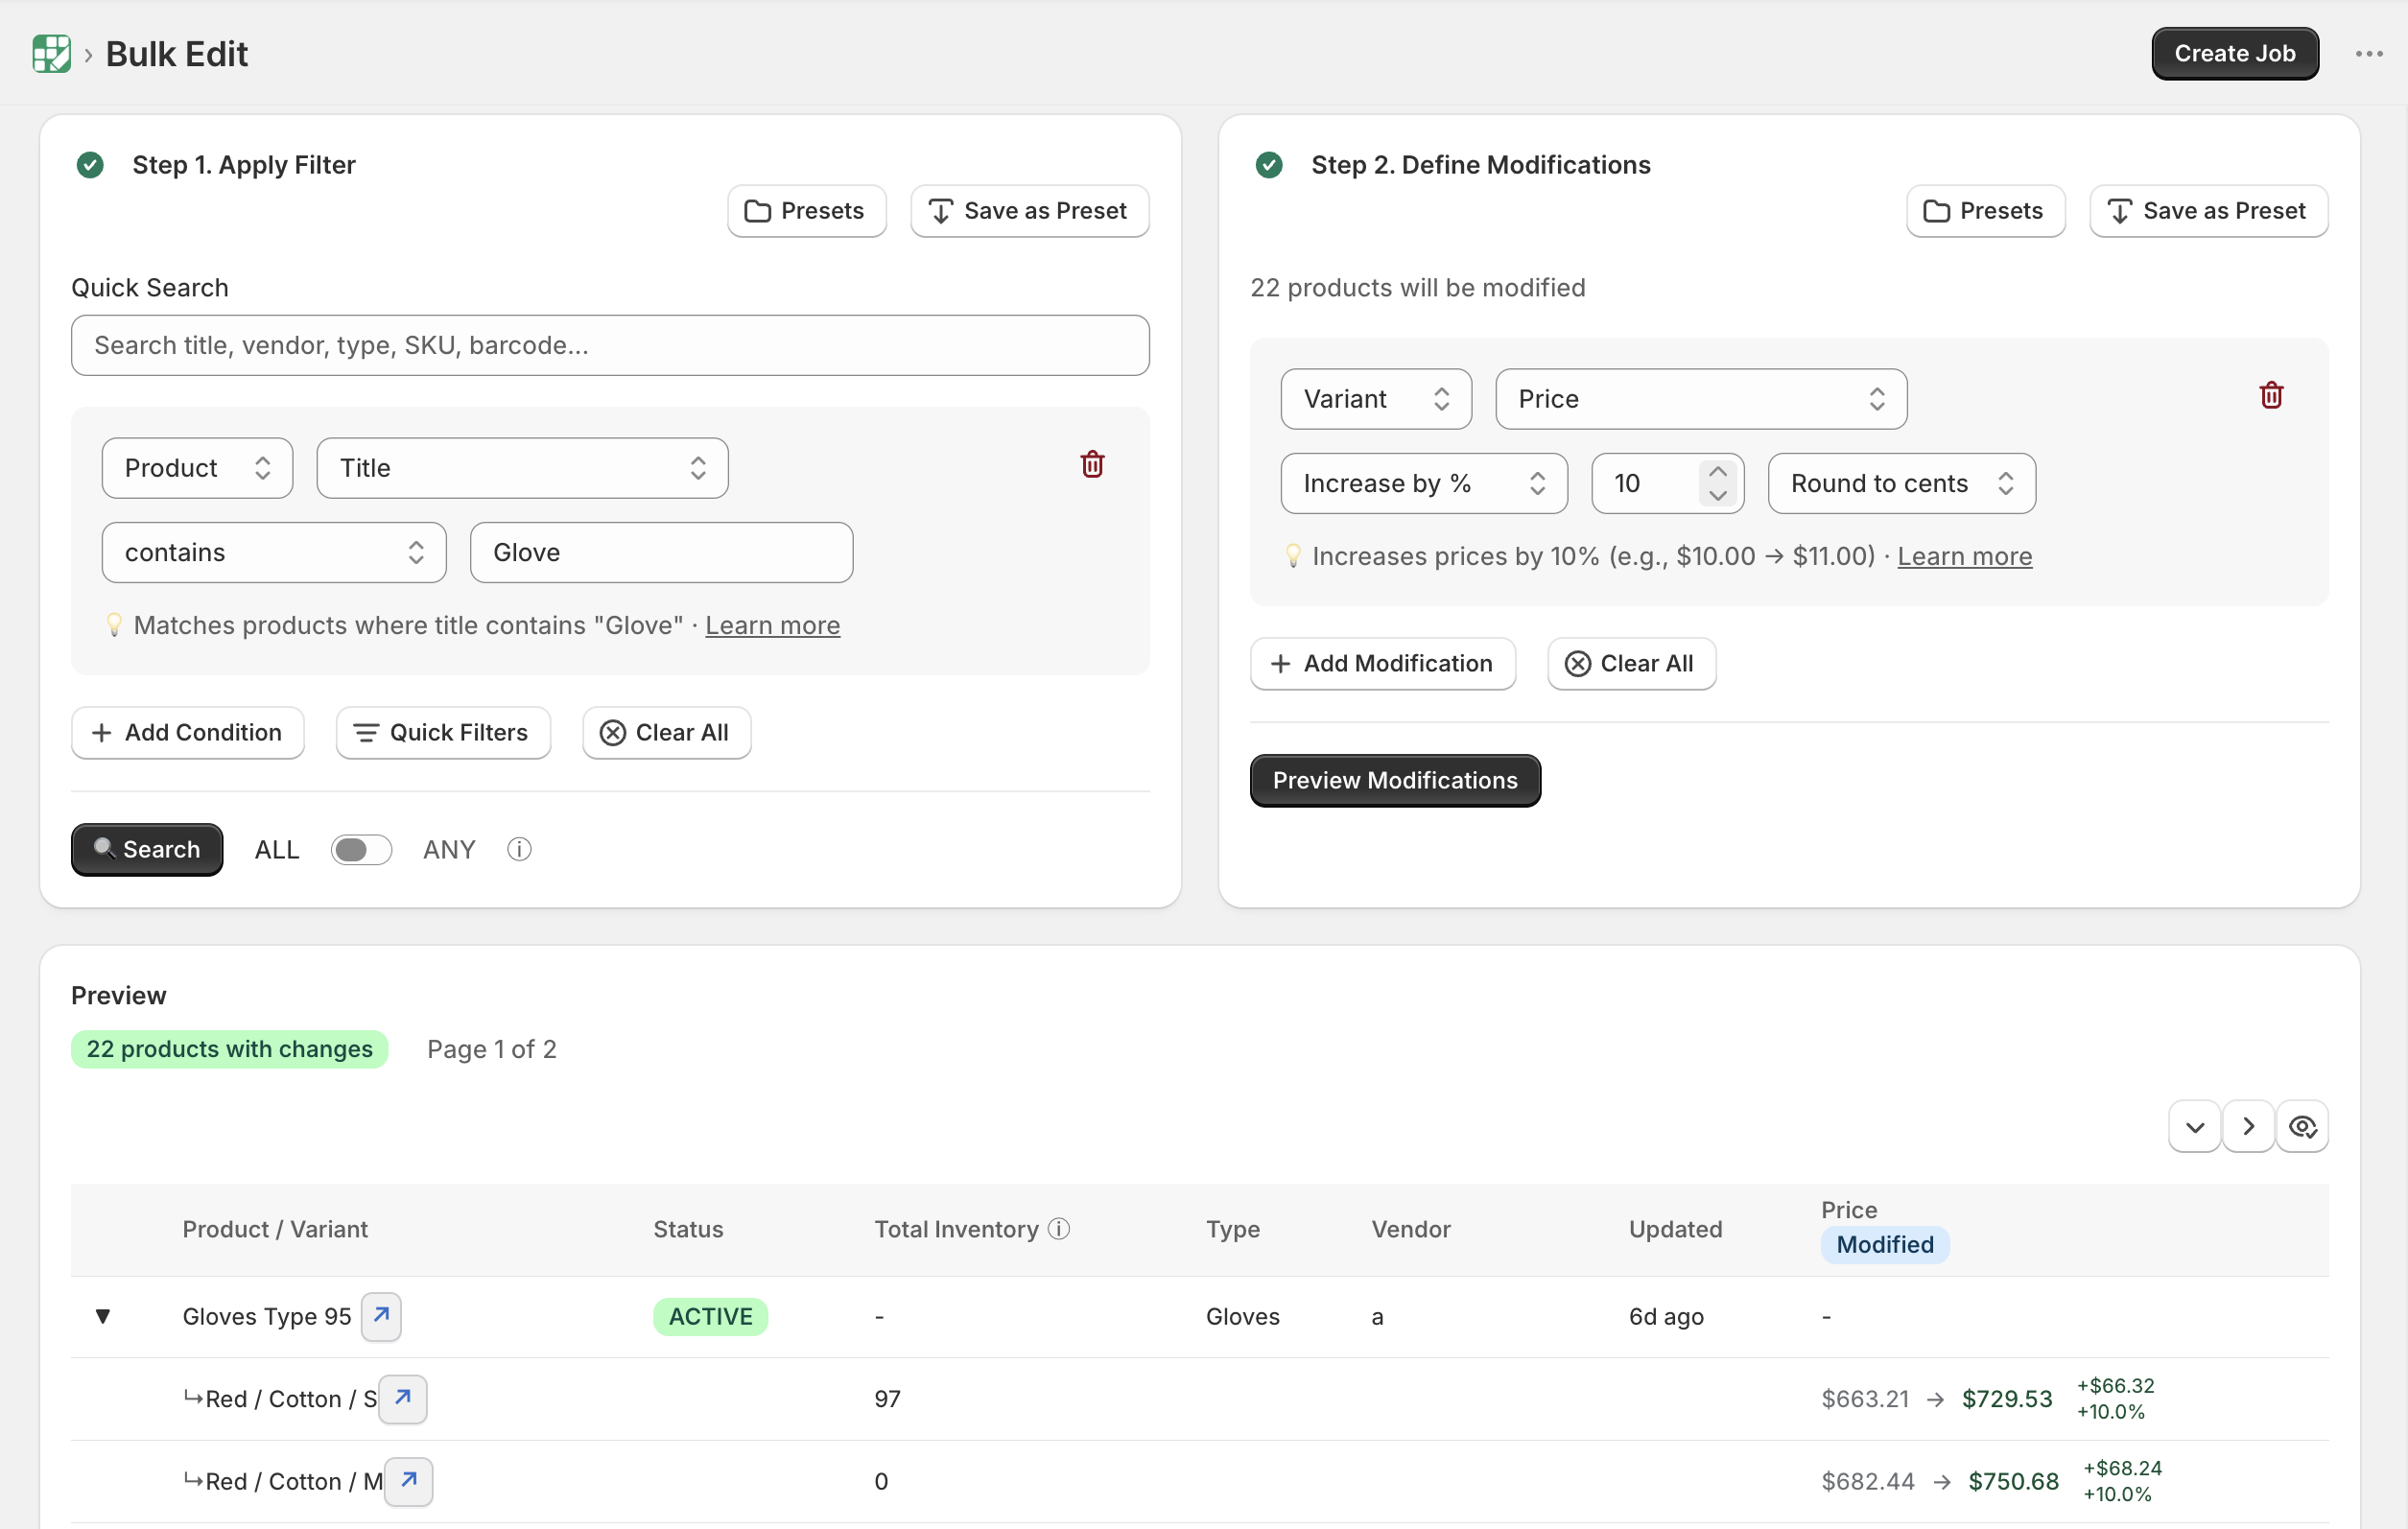
The Filters panel is where you tell the app which products or variants to act on. A filter is a list of conditions, joined by either ALL (AND) or ANY (OR) logic.
- Pick the join mode at the top of the panel: Match ALL or Match ANY.
- Click Add Condition.
- Pick a field (product title, vendor, tags, status, price, inventory, metafield, etc.), pick an operator (contains, equals, is greater than, has duplicates, …), then enter the value.
- Repeat for as many conditions as you need.
- (Optional) Type into the Quick search box to add a fast text search across title, vendor, product type, SKU, and barcode.
- Click Search to run the filter.
Build conditions, then click Search to see matching products and variants.
The results table at the bottom updates with the matching rows. Tweak the conditions if you need to and click Search again.
Filter presets
If you build a filter you'll use again, click Save preset, give it a name, and you'll be able to reload the exact same condition set from the Load preset menu next time. See Filter presets for details and plan limits.
For the full list of supported fields, operators, and worked examples, see Setting up filters.
Step 2 — Define your modifications
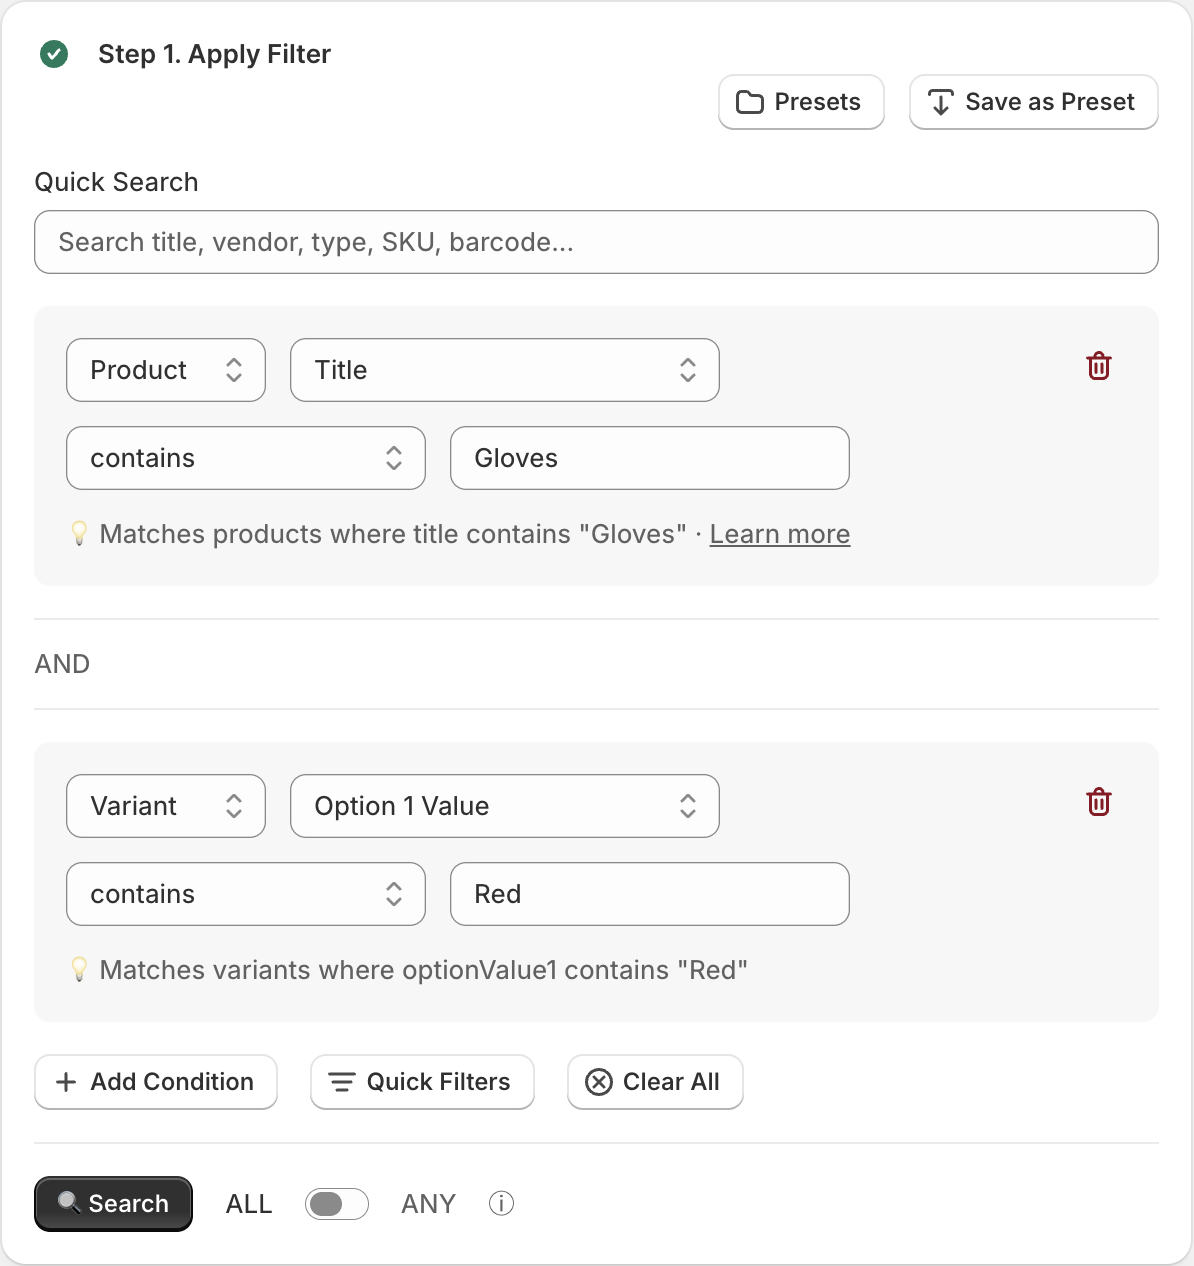
The Modifications panel becomes active as soon as you have filter results. A modification is a change to apply to every matching row — for example "set vendor to Acme", or "increase price by 10%".
- Click Add Modification.
- Pick the field you want to change (title, description, price, tags, status, SKU, weight, metafield, …).
- Pick the operation. The available operations depend on the field — for text fields you'll see Set, Append, Prepend, Search & Replace, Clear; for number fields you'll see Set, Increase, Decrease (by a fixed amount or percentage); for tags you'll see Add, Remove, Replace; and so on.
- Enter the new value.
- Add more modifications if you want to change multiple fields in the same job. Your plan caps the number per job — Free 2, Starter 5, Growth 5, Scale 10.
Each modification is a field + operation + value. Stack as many as your plan allows.
Preview the exact changes
Once you've added modifications, click Preview. The results table switches into preview mode and shows the before and after values for every row that will change.
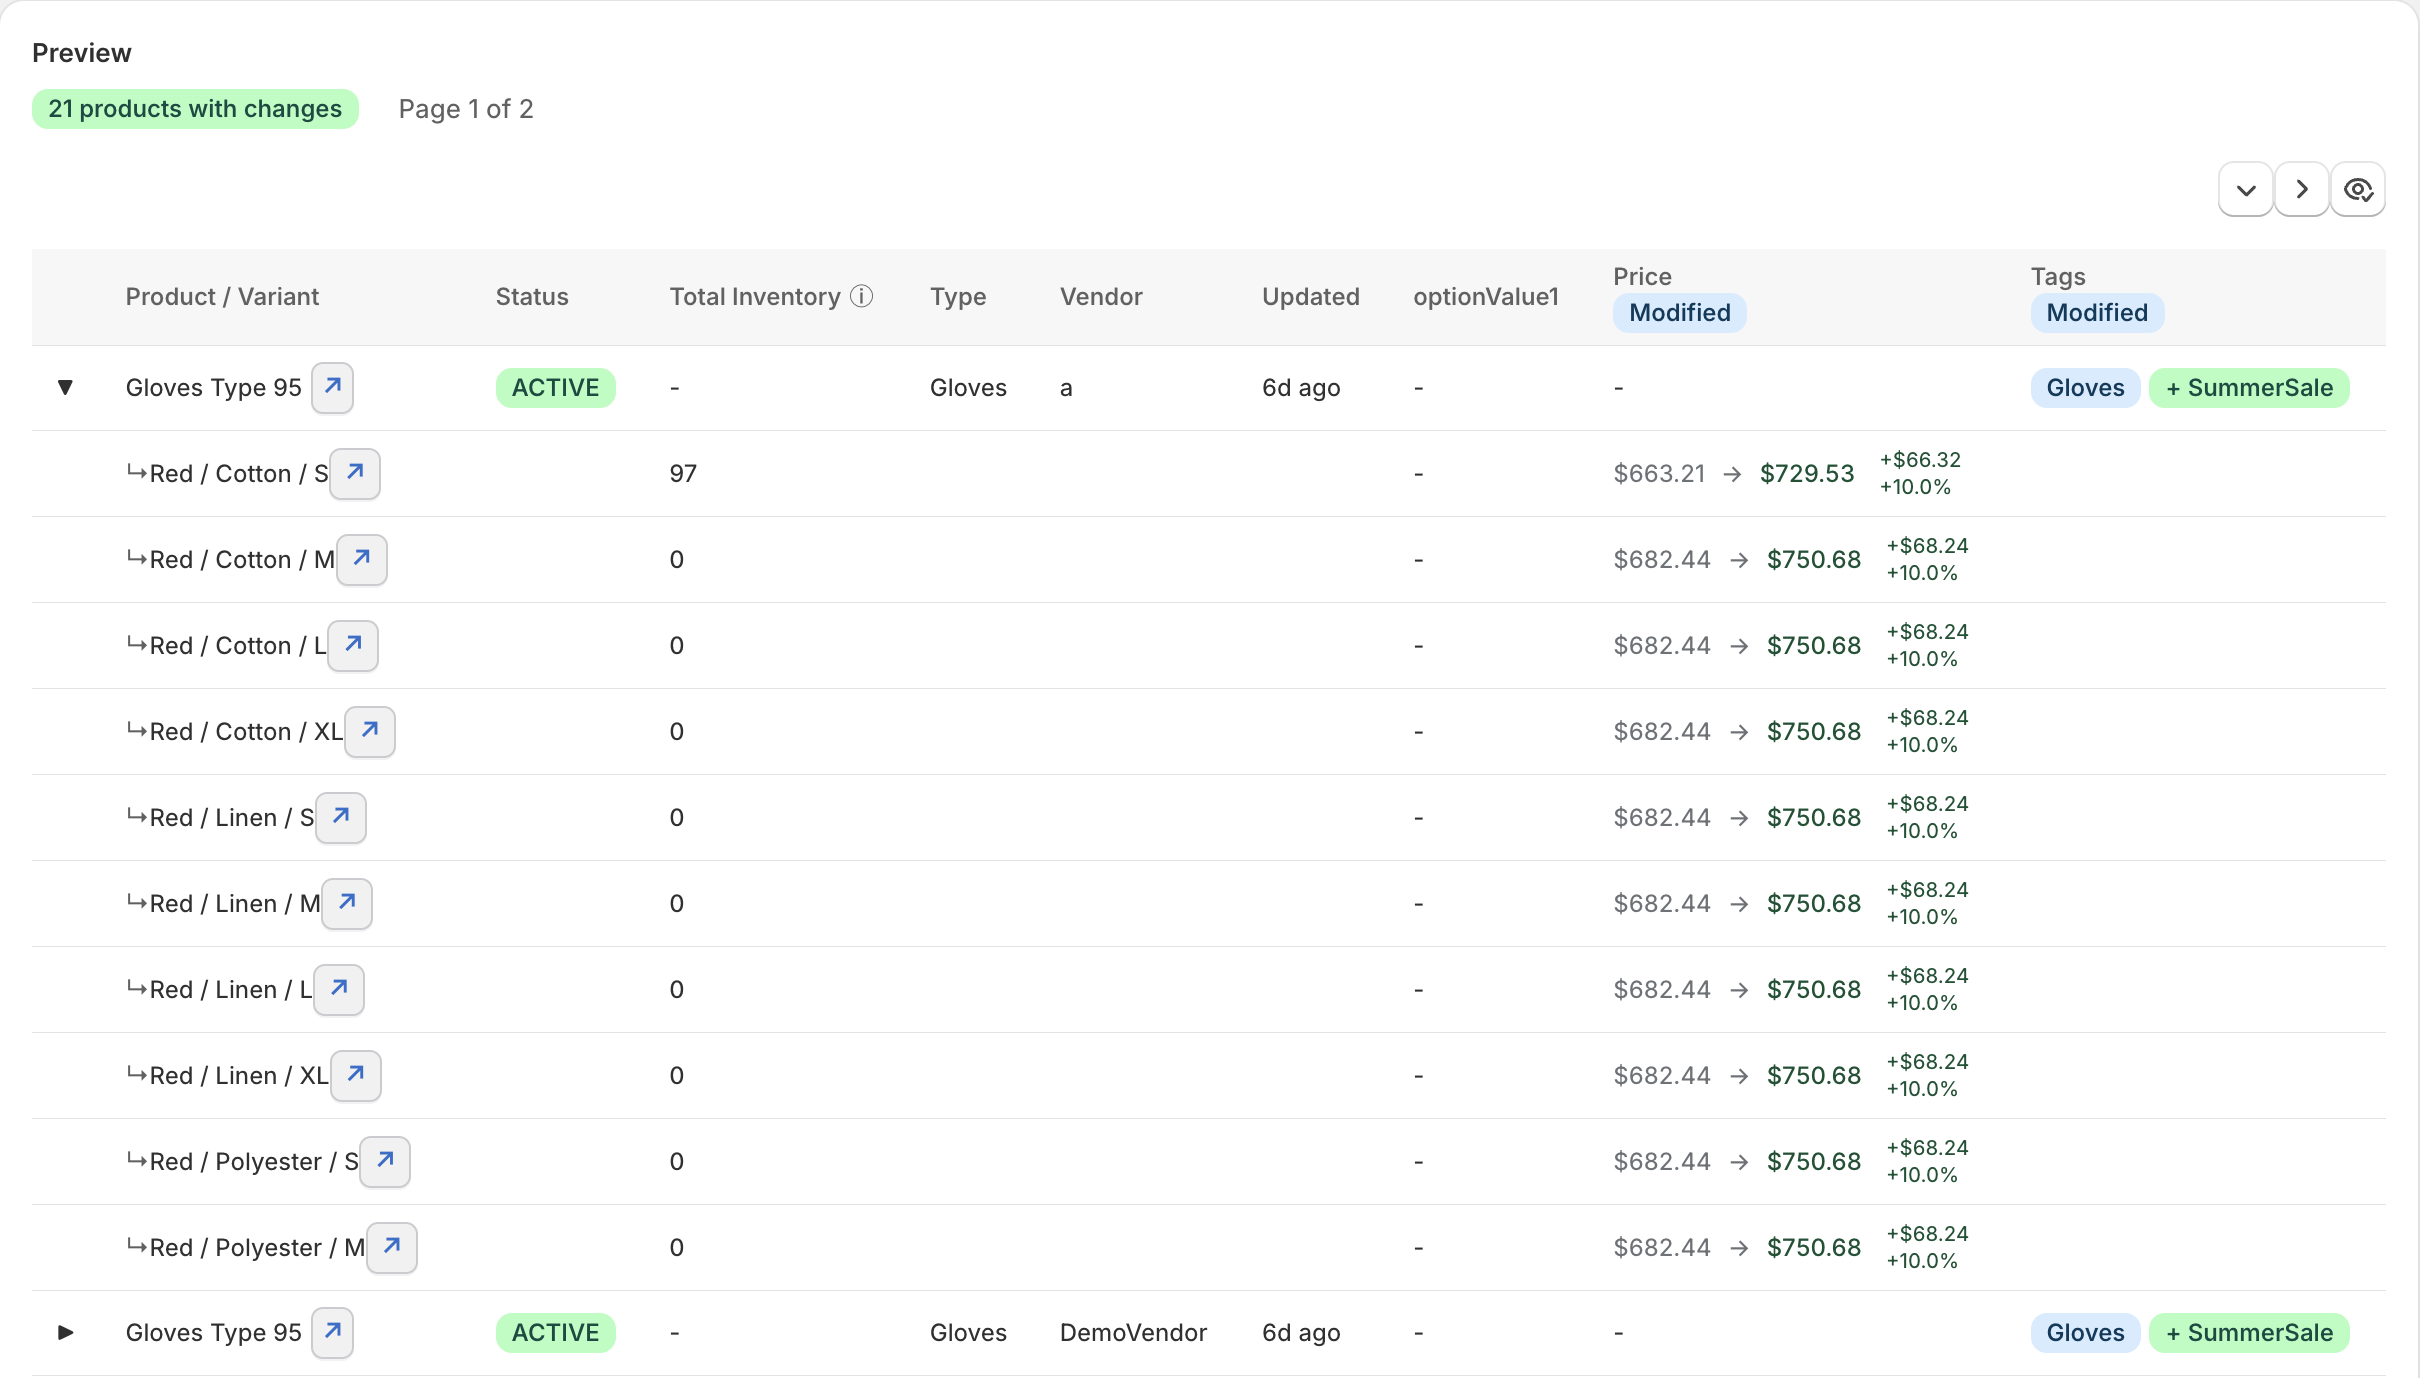
Preview mode shows the exact diff for every row. Nothing has been applied yet.
Nothing is written to Shopify yet — this is your last chance to catch mistakes. If something looks off, edit your filters or modifications and click Preview again.
Modification presets
You can save a set of modifications the same way as filters — click Save preset in the Modifications panel. See Modification templates.
Step 3 — Create the job
When the filter and modifications look right, click Create Job in the top-right. A dialog opens where you choose how the job runs.
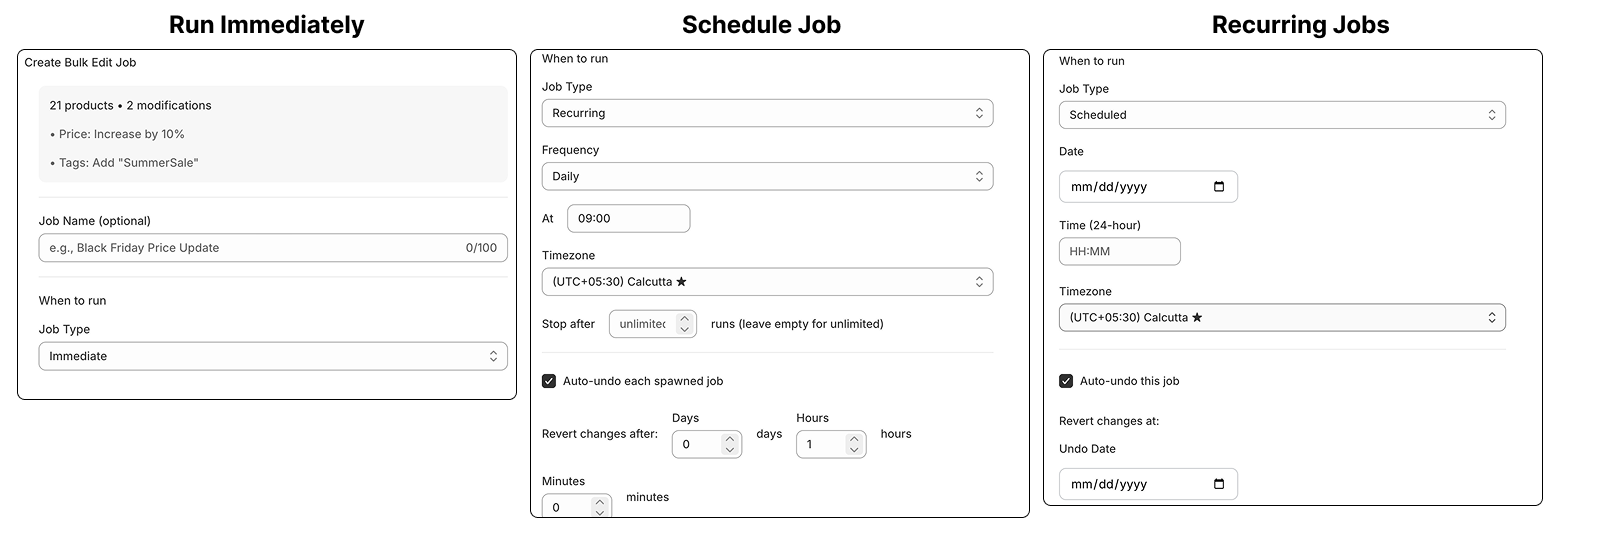
The Create Job dialog — name, description, job type, and schedule options.
Common fields
- Job name — Anything memorable (e.g. "Holiday price bump"). Optional; auto-generated if blank.
- Description — Optional context for your team or for your future self.
Job type
Pick one of three types:
- Immediate — Runs the job right now. As soon as you click Run now, it's queued and you're sent to the job detail page.
- Scheduled — Runs once at a specific date and time you pick. You can also turn on Auto-revert to schedule a second job that restores the original values at a later date/time (great for time-boxed sales).
- Recurring — Runs on a repeating schedule. Pick the frequency (Daily, Weekly, Monthly, or Yearly — availability depends on your plan), the time of day, your timezone, and the recurrence config (e.g. days of week for Weekly). Optionally set a maximum number of runs to cap the automation.
Plan limits apply: free plans can only schedule weekly or monthly recurrences, paid plans unlock daily. See Pricing for the full breakdown.
Submit
Click Run now (Immediate) or Schedule (Scheduled / Recurring). The app validates against your plan limits and creates the job.
After the job is created
You're sent to the job detail page. Here you can:
- Verify the filters and modifications that were captured.
- See the list of affected products and the exact before/after for each.
- Watch progress as the job runs.
- Once it's complete, Revert the job to roll back every change — within your plan's retention window.
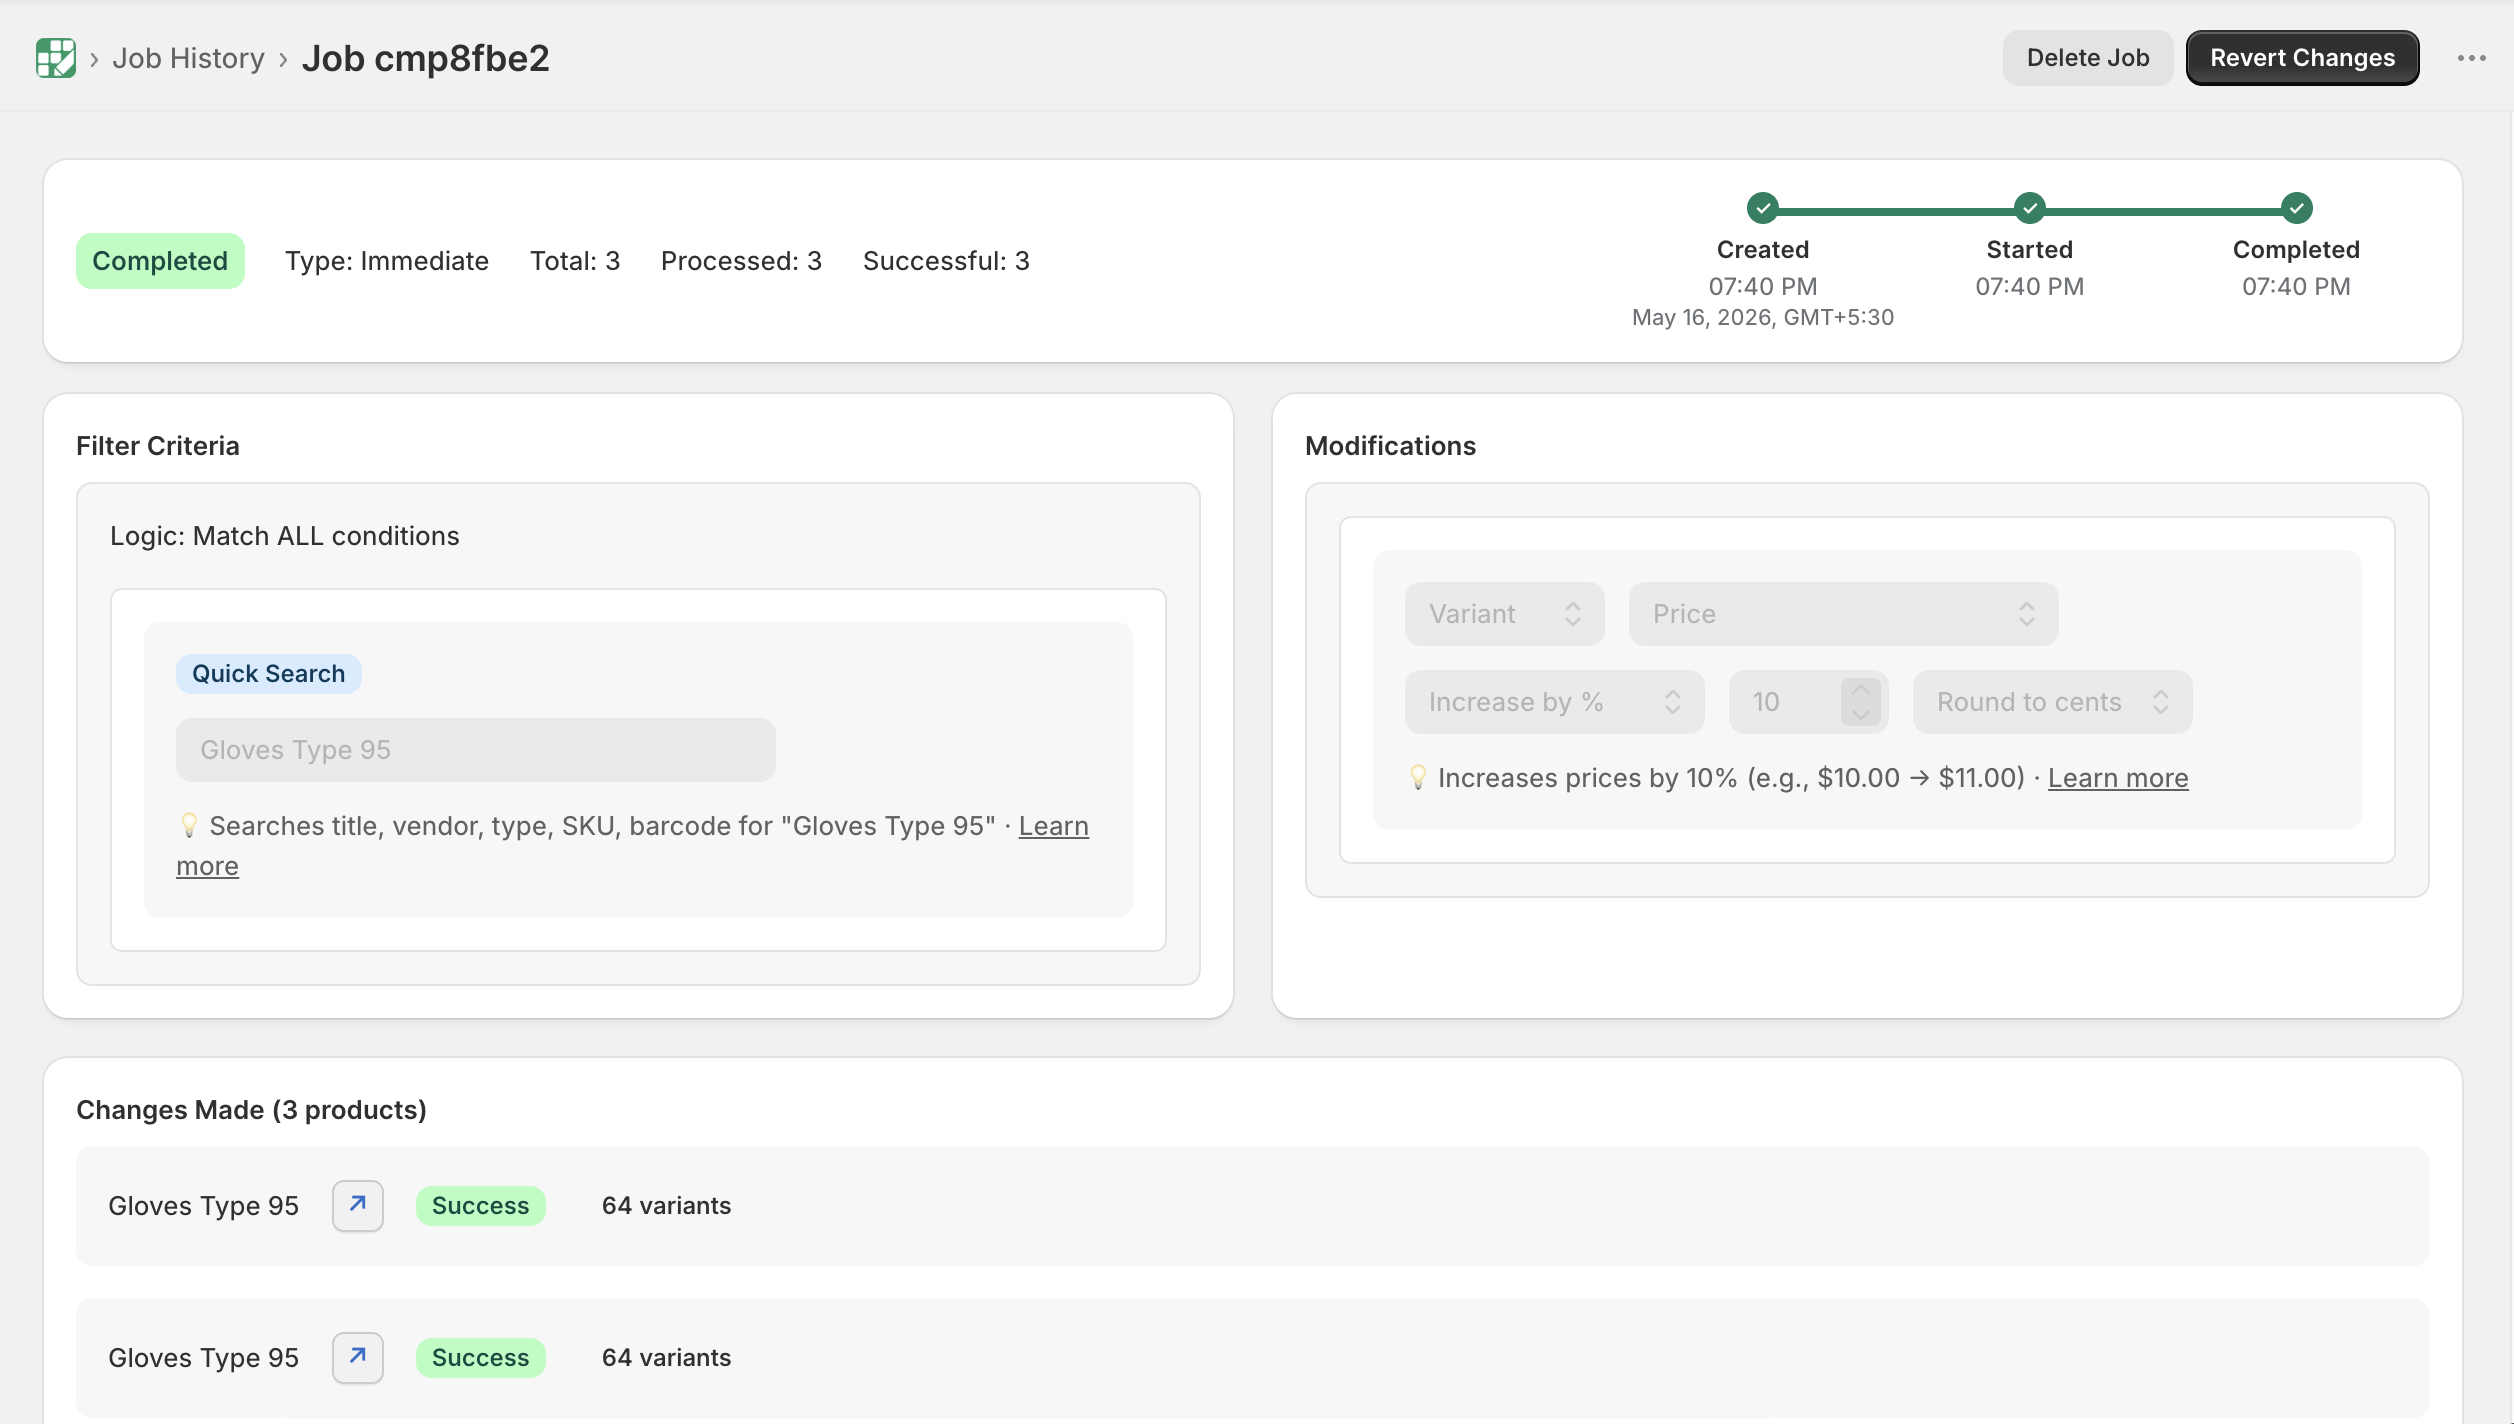
Job detail page — your audit trail. Revert is one click.
What's next?
- Setting up filters — Every supported field and operator with real examples.
- Tracking changes — Read your job history and follow every modification.
- Reverting changes — How undo works.